ARTWORK: Artist @ LIELMAN
In Order to use the image in this tutorial you MUST purchase it from PICSFORDESIGN.COM
PSP 9 (Any Version Will Work)
SCRAP KIT: Magical Garden from Hania
MASK: vix mask no 241
TEMPLATE: missy's template no 378
FONT: Aquarelle
Okay Lets Begin!
Open new canvas 550X550
Paste paper 1 as a new layer.
Activate your mask
Go to load/save mask
Load mask from disk
Find your mask and click load.
Open your template.
Paste them one by one.
Colorize to your liking with the paper of your choice.
Paste a tube of your choice as a new layer.
Place to your liking then paste your elements as a new layer.
Elements are
27
80
81
41
59
61
65
98
100
6
11
26
50
52
56
63
64
77
78
82
83
23
75
12
30
my sparkle
Pls resize to your liking.
Use my tag above as a guide.
I resize all my elements 30% to 50%
Dont forget to put drop shadow of choice to all layers.
Add your name and copyright info
Saved your tag as png.
You are done!
Thanks for trying my tutorial.
***Gorgeous Arie 2013***
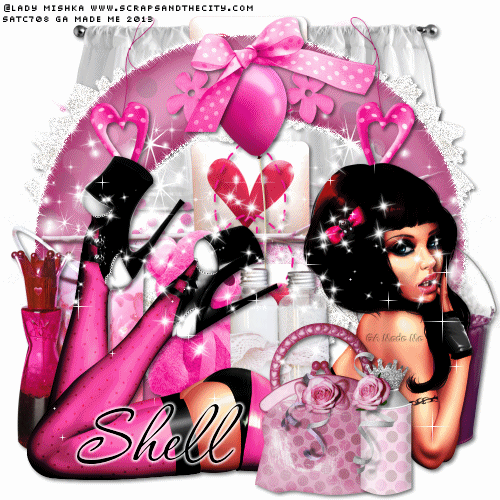
ARTWORK: Artist @ LADY MISHKA
In Order to use the image in this tutorial you MUST purchase it from SATC
PSP 9 (Any Version Will Work)
SCRAP KIT: Pamper Me from Shell
MASK: Vix mask no 233
TEMPLATE: no template
FONT: P22 Corinthia
Okay Lets Begin!
Open new canvas 500X500
Paste paper 10 as a new layer.
Activate your mask
Go to load/save mask
Load mask from disk
Find your mask and click load.
Open your frame 2.
Paste them one by one.
Colorize to your liking with the paper of your choice.
Paste a tube of your choice as a new layer.
Place to your liking then paste your elements as a new layer.
Elements are
frame 2
heart 5
bubbles 1
heart 6
bag 1
bow 4
flower 12
present 1
perfume 1
balloon 1
flower 8
teddy 1
heart 1
bottle 2
bucket 1
curtain 1
tin 1
my sparkle
Pls resize to your liking.
Use my tag above as a guide.
I resize all my elements to 30%-50%
Dont forget to put drop shadow of choice to all layers.
Add your name and copyright info
Now will go for my animation sparkle thingy lol
Go to layer 2(mask) add noise gaussian 40 click ok
Go to layer 4(heart) add noise gaussian click ok
Go to layer 3(frame) constellation 2.21 50 60 0 100 76 click ok
Go to layer 5(tube) vm sparkle setting is 20 click ok
First layer save them as tag1gif.
Go to layer 2(mask) add noise gaussian 35 click ok
Go to layer 4(heart) add noise gaussian click ok
Go to layer 3(frame) constellation click random seed 1x
Go to layer 5(tube) vm sparkle setting is 25 click ok
Second layer save them as tag2gif.
Go to layer 2(mask) add noise gaussian 30 click ok
Go to layer 4(heart) add noise gaussian click ok
Go to layer 3(frame) constellation click random seed 1x
Go to layer 5(tube) vm sparkle setting is 30 click ok
Third layer save them as tag3gif.
Lastly open your tag view animation
Saved your tag as gif.
You are done!
Thanks for trying my tutorial.
***Gorgeous Arie 2013***
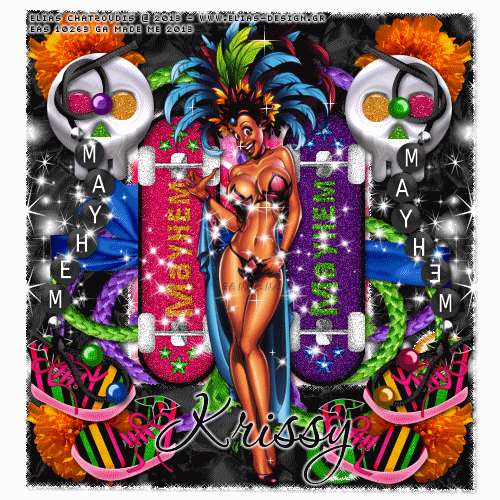
ARTWORK: Artist @ ELIAS CHATZOUDIS
In Order to use the image in this tutorial you MUST purchase it from EAS
PSP 9 (Any Version Will Work)
SCRAP KIT: Mayhem from Krissy
MASK: Vix mask no 232
TEMPLATE: no template
FONT: Aquarelle
Okay Lets Begin!
Open new canvas 500X500
Paste paper 3 as a new layer.
Activate your mask
Go to load/save mask
Load mask from disk
Find your mask and click load.
Open your frame 2.
Paste them one by one.
Colorize to your liking with the paper of your choice.
Paste a tube of your choice as a new layer.
Place to your liking then paste your elements as a new layer.
Elements are
button embellished frame 2
beaded string 1
beaded string 2
glittered silver skull 2
shoes 2
wrap 4
skateboard 1
skateboard 2
realistic bloom 4
string 1
string 3
my sparkle
Pls resize to your liking.
Use my tag above as a guide.
I resize all my elements to 30%-50%
Dont forget to put drop shadow of choice to all layers.
Add your name and copyright info
Now will go for my animation sparkle thingy lol
Go to layer 3(frame) constellation 2.21 50 60 0 100 76 click ok
Go to layer 12 & 13(skateboard) add noise gaussian click 40 click ok
Go to layer 4(tube) sparkle setting is 20
First layer save them as tag1gif.
Go to layer 3(frame) constellation click random seed 1x
Go to layer 12 & 13(skateboard) add noise gaussian click 35 click ok
Go to layer 4(tube) sparkle setting is 25
Second layer save them as tag2gif.
Go to layer 3(frame) constellation click random seed 1x
Go to layer 12 & 13(skateboard) add noise gaussian click 30 click ok
Go to layer 4(tube) sparkle setting is 30
Third layer save them as tag3gif.
Lastly open your tag view animation
Saved your tag as gif.
You are done!
Thanks for trying my tutorial.
***Gorgeous Arie 2013***

ARTWORK: Artist @ ELIAS CHATZOUDIS
In Order to use the image in this tutorial you MUST purchase it from EAS
PSP 9 (Any Version Will Work)
SCRAP KIT: Emo Easter from Danielle
MASK: vix mask no 232
TEMPLATE: no template
FONT: Aquarelle
Okay Lets Begin!
Open new canvas 550X550
Paste paper 2 as a new layer.
Activate your mask
Go to load/save mask
Load mask from disk
Find your mask and click load.
Open your frame 1.
Paste them one by one.
Colorize to your liking with the paper of your choice.
Paste a tube of your choice as a new layer.
Place to your liking then paste your elements as a new layer.
Elements are
emo frame with bows
egg lights
easter basket with eggs
happy easter eggs
butterfly
emo kitty on stick
emo bunny
bunny cupcake
my sparkle
Pls resize to your liking.
Use my tag above as a guide.
I resize all my elements to 30%-50%
Dont forget to put drop shadow of choice to all layers.
Add your name and copyright info
Now will go for my animation sparkle thingy lol
Go to layer 2(mask) add noise gaussian click 40 click ok
Go to layer 3(frame) constellation 2.21 50 60 0 100 76 click ok
Go to layer 4(tube) sparkle setting is 20
First layer save them as tag1gif.
Go to layer 2(mask) add noise gaussian click 35 click ok
Go to layer 3(frame) constellation click random seed 1x
Go to layer 4(tube) sparkle setting is 25
Second layer save them as tag2gif.
Go to layer 2(mask) add noise gaussian click 30 click ok
Go to layer 3(frame) constellation click random seed 1x
Go to layer 4(tube) sparkle setting is 30
Third layer save them as tag3gif.
Lastly open your tag view animation
Saved your tag as gif.
You are done!
Thanks for trying my tutorial.
***Gorgeous Arie 2013***
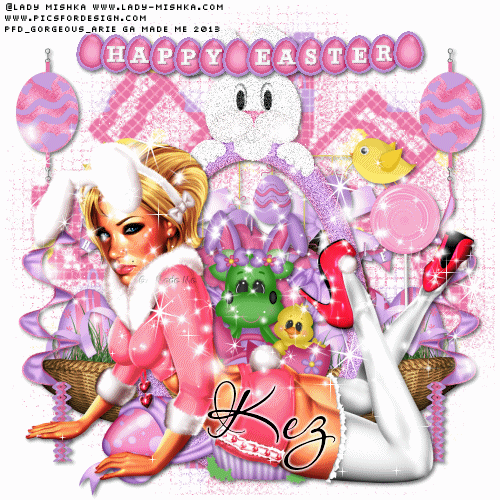
ARTWORK: Artist @ LADY MISHKA
In Order to use the image in this tutorial you MUST purchase it from PICSFORDESIGN.COM
PSP 9 (Any Version Will Work)
SCRAP KIT: Dino Easter Fun from Kez
MASK: Aqua mask no 16
TEMPLATE: no template
FONT: Aquarelle
Okay Lets Begin!
Open new canvas 500X500
Paste paper 3 as a new layer.
Activate your mask
Go to load/save mask
Load mask from disk
Find your mask and click load.
Open your frame D36.
Paste them one by one.
Colorize to your liking with the paper of your choice.
Paste a tube of your choice as a new layer.
Place to your liking then paste your elements as a new layer.
Elements are
D36
D9
D25
D8
D31
D26
D2
D28
D22
my sparkle
Pls resize to your liking.
Use my tag above as a guide.
I resize all my elements to 30%-50%
Dont forget to put drop shadow of choice to all layers.
Add your name and copyright info
Now will go for my animation sparkle thingy lol
Go to layer 2(mask) constellation 2.21 50 60 0 100 76 click ok
Go to layer 3(frame) add noise gaussian 40 click ok
Go to layer 4(tube) sparkle setting is 20
First layer save them as tag1gif.
Go to layer 2(mask) constellation click random seed 1x
Go to layer 3(frame) add noise gaussian 35 click ok
Go to layer 4(tube) sparkle setting is 25
Second layer save them as tag2gif.
Go to layer 2(mask) constellation click random seed 1x
Go to layer 3(frame) add noise gaussian 30 click ok
Go to layer 4(tube) sparkle setting is 30
Third layer save them as tag3gif.
Lastly open your tag view animation
Saved your tag as gif.
You are done!
Thanks for trying my tutorial.
***Gorgeous Arie 2013***
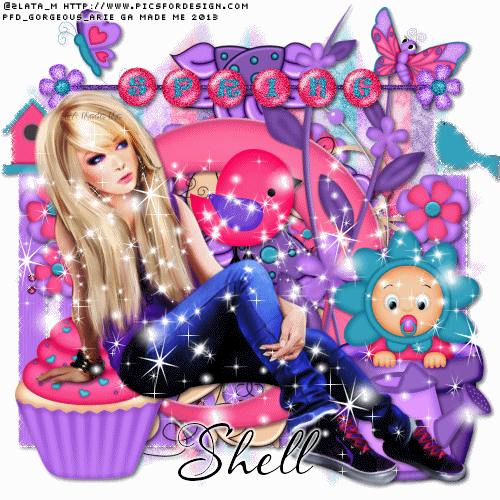
ARTWORK: Artist @ ZLATA M
In Order to use the image in this tutorial you MUST purchase it from PICSFORDESIGN.COM
PSP 9 (Any Version Will Work)
SCRAP KIT: Spring Beauty from Shell
MASK: rieka mask no 4
TEMPLATE: no template
FONT: Aquarelle
Okay Lets Begin!
Open new canvas 500X500
Paste paper 5 as a new layer.
Activate your mask
Go to load/save mask
Load mask from disk
Find your mask and click load.
Open your frame 1.
Paste them one by one.
Colorize to your liking with the paper of your choice.
Paste a tube of your choice as a new layer.
Place to your liking then paste your elements as a new layer.
Elements are
frame 1
flower doodle 1
sunflower 1
wordart 1
fence 1
flower doodle 2
babyinpot 1
bird 3
butterfly 4
butterfly 5
watercan 2
cupcake 2
my sparkle
Pls resize to your liking.
Use my tag above as a guide.
I resize all my elements to 30%-50%
Dont forget to put drop shadow of choice to all layers.
Add your name and copyright info
Now will go for my animation sparkle thingy lol
Go to layer 2(mask) add noise gaussian click 40 click ok
Go to layer 9(fence) constellation 2.21 50 60 0 100 76 click ok
Go to layer 8(wordart) add noise gaussian click ok
Go to layer 4(tube) sparkle setting is 20
First layer save them as tag1gif.
Go to layer 2(mask) add noise gaussian click 35 click ok
Go to layer 9(fence) constellation click random seed 1x
Go to layer 8(wordart) add noise gaussian click ok
Go to layer 4(tube) sparkle setting is 25
Second layer save them as tag2gif.
Go to layer 2(mask) add noise gaussian click 30 click ok
Go to layer 9(fence) constellation click random seed 1x
Go to layer 8(wordart)add noise gaussian click ok
Go to layer 4(tube) sparkle setting is 30
Third layer save them as tag3gif.
Lastly open your tag view animation
Saved your tag as gif.
You are done!
Thanks for trying my tutorial.
***Gorgeous Arie 2013***
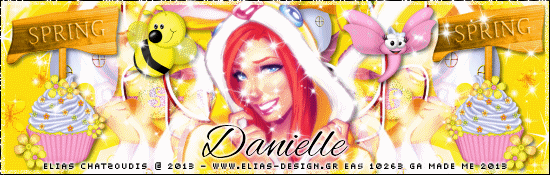
ARTWORK: Artist @ ELIAS CHATZOUDIS
In Order to use the image in this tutorial you MUST purchase it from EAS
PSP 9 (Any Version Will Work)
SCRAP KIT: Sweet On Spring from Danielle
MASK: rieka mask no 4
TEMPLATE: no template
FONT: AlexBrush
Okay Lets Begin!
Open new canvas 550X550
Paste paper 5 as a new layer.
Activate your mask
Go to load/save mask
Load mask from disk
Find your mask and click load.
Open your flower frame.
Paste them one by one.
Colorize to your liking with the paper of your choice.
Paste a tube of your choice as a new layer.
Place to your liking then paste your elements as a new layer.
Elements are
flower frame
flower doodle
spring branch
spring word art
decoration flower
happy sun
bee
butterfly
dragon fly
ribbon
beach cupcake
my sparkle
Pls resize to your liking.
Use my tag above as a guide.
I resize all my elements 30% to 50%
Dont forget to put drop shadow of choice to all layers.
Add your name and copyright info
Saved your tag as png.
You are done!
Thanks for trying my tutorial.
***Gorgeous Arie 2013***
ARTWORK: Artist @ PINUPTOONS
In Order to use the image in this tutorial you MUST purchase it from CDO
PSP 9 (Any Version Will Work)
SCRAP KIT: Mums Purple Passion from Krissy
MASK: rieka mask no 5
TEMPLATE: no template
FONT: Aquarelle
Okay Lets Begin!
Open new canvas 550X550
Paste paper 5 as a new layer.
Activate your mask
Go to load/save mask
Load mask from disk
Find your mask and click load.
Open your metal frame 1.
Paste them one by one.
Colorize to your liking with the paper of your choice.
Paste a tube of your choice as a new layer.
Place to your liking then paste your elements as a new layer.
Elements are
metal frame 1
bow with beads 2
elegant wrap 2
love badge 4
stitched sequin 1
sweet cake sucker 2
swag curtain 1
nail polish 1
sexy sting backs 1
arm chair 1
painted flower 1
angora cat 1
knotted stitching 3
my sparkle
Pls resize to your liking.
Use my tag above as a guide.
I resize all my elements 30% to 50%
Dont forget to put drop shadow of choice to all layers.
Add your name and copyright info
Saved your tag as png.
You are done!
Thanks for trying my tutorial.
***Gorgeous Arie 2013***
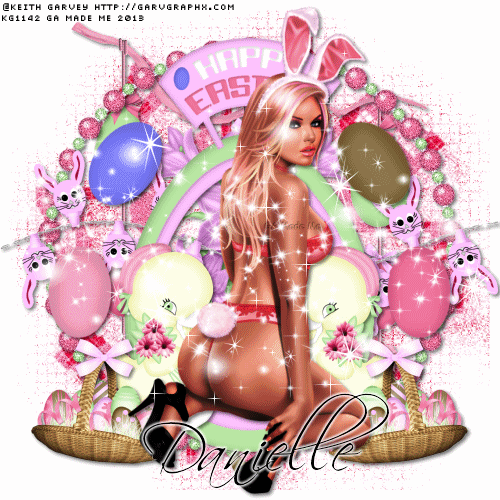
ARTWORK: Artist @ KEITH GARVEY
In Order to use the image in this tutorial you MUST purchase it from GARV
PSP 9 (Any Version Will Work)
SCRAP KIT: Luv Bunny from Danielle
MASK: aqua mask no 16
TEMPLATE: no template
FONT: Scriptina
Okay Lets Begin!
Open new canvas 500X500
Paste paper 11 as a new layer.
Activate your mask
Go to load/save mask
Load mask from disk
Find your mask and click load.
Open your beaded round frame.
Paste them one by one.
Colorize to your liking with the paper of your choice.
Paste a tube of your choice as a new layer.
Place to your liking then paste your elements as a new layer.
Elements are
beaded round frame
egg frame
bunny lights
egg mobiles
easter basket
easter lillies
duck with daisies
my sparkle
Pls resize to your liking.
Use my tag above as a guide.
I resize all my elements to 30%-50%
Dont forget to put drop shadow of choice to all layers.
Add your name and copyright info
Now will go for my animation sparkle thingy lol
Go to layer 2(mask) add noise gaussian click 40 click ok
Go to layer 3(frame) add noise gaussian click ok
Go to layer 5(tube) sparkle setting is 20
First layer save them as tag1gif.
Go to layer 2(mask) add noise gaussian click 35 click ok
Go to layer 3(frame) add noise gaussian click ok
Go to layer 5(tube) sparkle setting is 25
Second layer save them as tag2gif.
Go to layer 2(mask) add noise gaussian click 30 click ok
Go to layer 3(frame)add noise gaussian click ok
Go to layer 5(tube) sparkle setting is 30
Third layer save them as tag3gif.
Lastly open your tag view animation
Saved your tag as gif.
You are done!
Thanks for trying my tutorial.
***Gorgeous Arie 2013***